Skill Level: Easy
Materials Required:
- Scissors
- Tapestry/Darning needle
- 5 mm crochet hook – Size H in U.S. sizes
- ~580 yards (~347 grams) Worsted Weight – Lily Sugar’n Cream 100% Cotton Yarn
- *above yardage inflated to adjust if you need more yarn, I purchased a cone of 674 yds (400 Grams) which was more than enough to complete the market bag
Stitches W/ Abbreviations:
- Ch Sp(s) – Chain Space(s)
- Ch St(s) – Chain Stitch(es)
- DC(s) – Double Crochet(s)
- Dec DC – Decrease Double Crochet Stitch
- reducing 2 Double Crochet into 1 Double Crochet stitch unless otherwise specified
- Inc DC – Increase Double Crochet Stitch
- placing 2 Double Crochet into 1 Double Crochet stitch unless otherwise specified
- Inc SC – Increase Single Crochet
- placing 2 Single Crochet into 1 Single Crochet stitch unless otherwise specified
- MC -Magic Circle
- SC(s) – Single Crochet(s)
- Sl St – Slip Stitch
- or equivalent – on this pattern I pull yarn through from to back and reinsert the hook on the back to create a more seamless slip stitch
- St(s) – Stitch(es)
*Pattern written in U.S. Terminology, with the exception of a few terms that are personal preference.
Creating the Base:
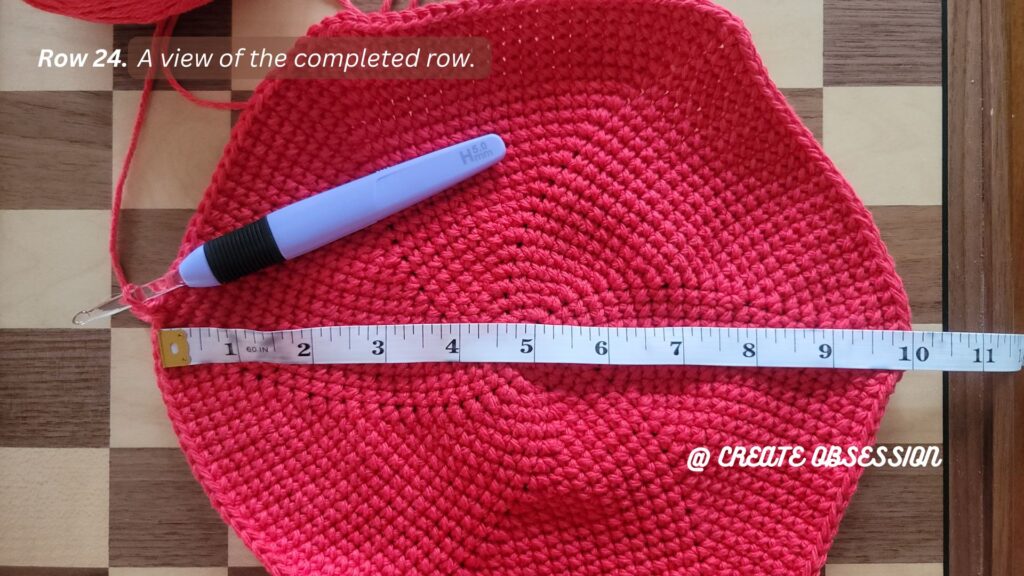
Row 1. MC with 6 SC, then pull it tight! (6)
Row 2. Inc *6 (12)
Row 3. (Inc, SC) * 6 (18)
Row 4. (Inc, 2 SC) * 6 (24)
Row 5. (Inc, 3 SC) * 6 (30)
Row 6. (Inc, 4 SC) * 6 (36)
Row 7. (Inc, 5 SC) * 6 (42)
Row 8. (Inc, 6 SC) * 6 (48)
Row 9. (Inc, 7 SC) * 6 (54)
Row 10. (Inc, 8 SC) * 6 (60)
Row 11. (Inc, 9 SC) * 6 (66)
Row 12. (Inc, 10 SC) * 6 (72)
Row 13. (Inc, 11 SC) * 6 (78)
Row 14. (Inc, 12 SC) * 6 (84)
Row 15. (Inc, 13 SC) * 6 (90)
Row 16. (Inc, 14 SC) * 6 (96)
Row 17. (Inc, 15 SC) * 6 (102)
Row 18. (Inc, 16 SC) * 6 (108)
Row 19. (Inc, 17 SC) * 6 (114)
Row 20. (Inc, 18 SC) * 6 (120)
Row 21. (Inc, 19 SC) * 6 (126)
Row 22. (Inc, 20 SC) * 6 (132)
Row 23. (Inc, 21 SC) * 6 (138)
Row 24. (Inc, 22 SC) * 6 (144)
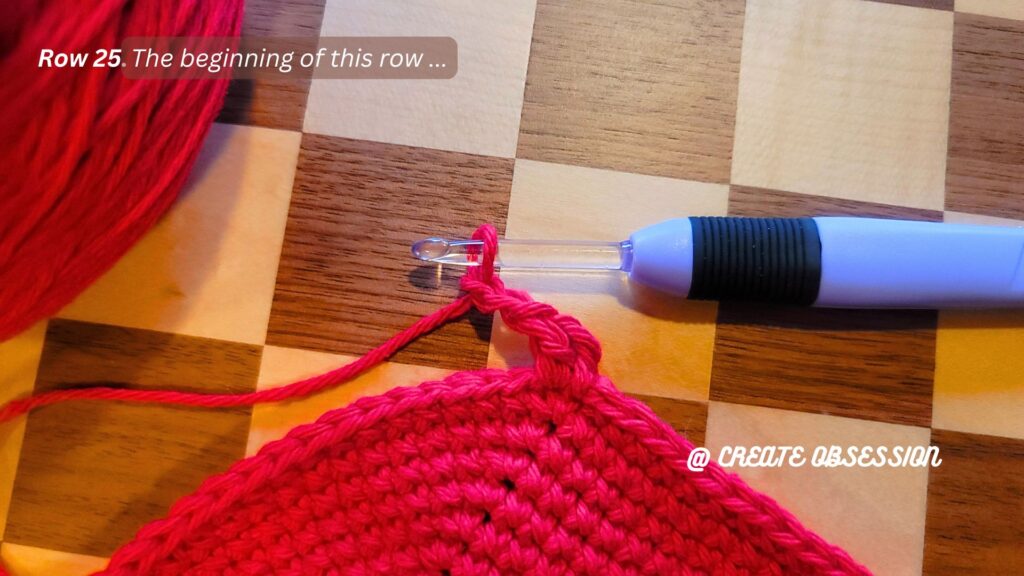
Creating the Center Mesh:
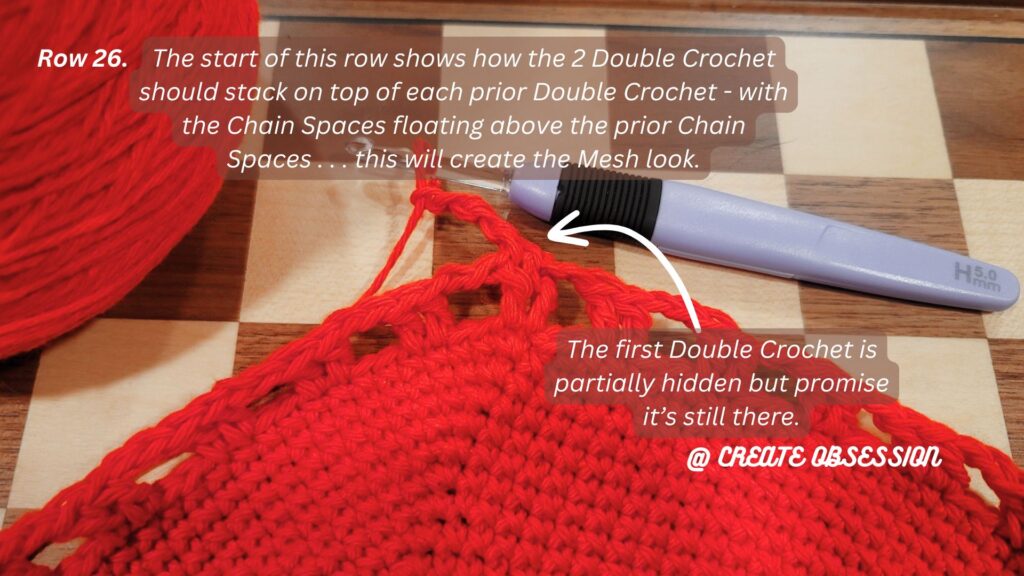
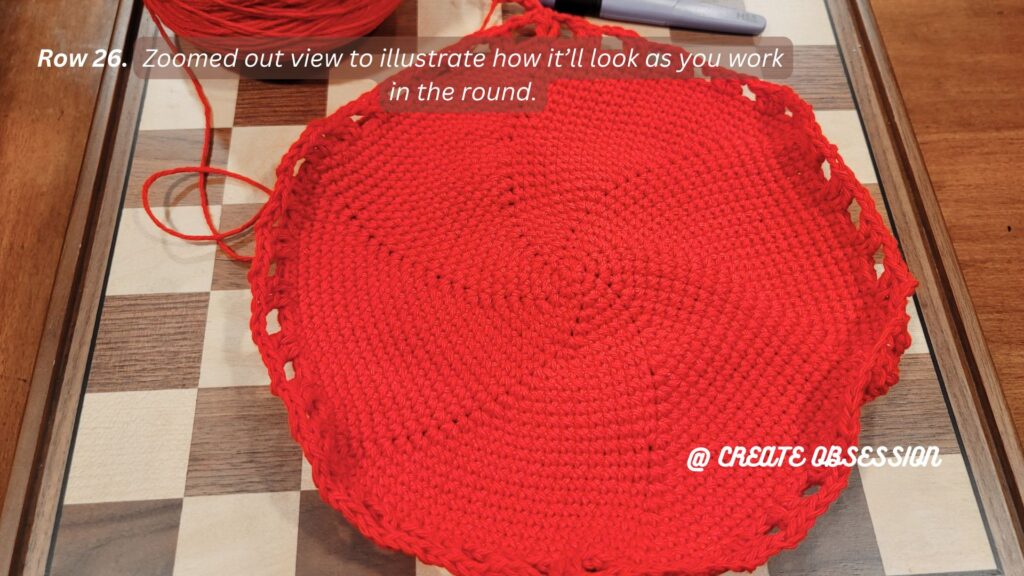
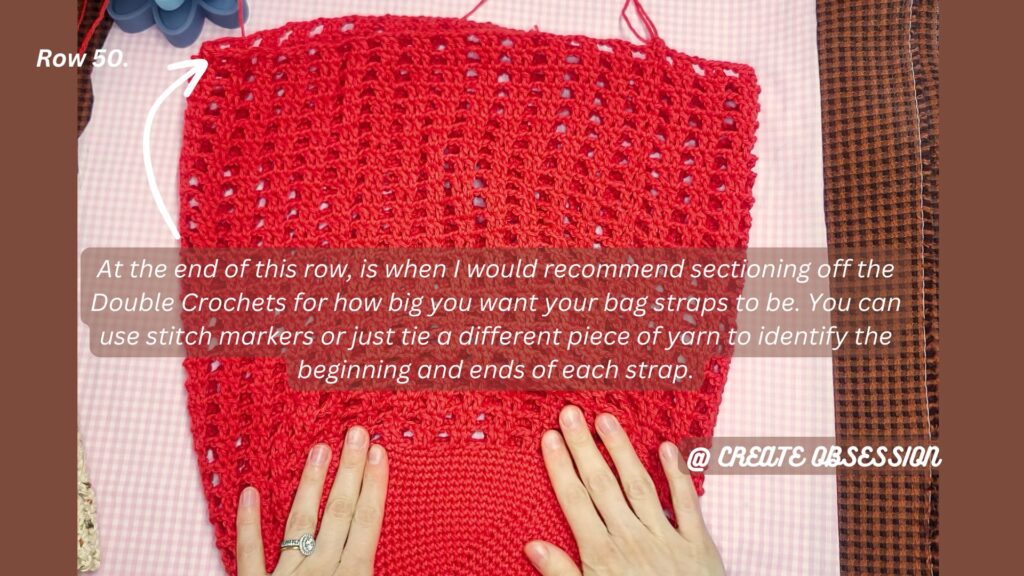
Rows 25-50. Ch 2 or DC equivalent into first st, DC, Ch 2 & Skip 2 Ch Sps below, ** 2 DC, Ch 2 & Skip 2 Ch Sps below** repeat X’s 35 until last Ch 2 & Skip 2 Ch Sps below and reconnect into a circle with Sl St or equivalent. This should leave you with a total of 36 pairs of DC. (Each subsequent row of DC and Ch Sps should repeat DC on top of DC and Ch Sps above prior Ch Sps.)
Creating the Straps (Non-Curved Version):
Before starting – add stitch markers grouping 5 DC pairs together, spacing the groups of 5 with 4 DC pairs in between each set of 5. This will determine the placement of the straps and also help deter you from over or undercounting the DC pair that belong to each strap when sewing on the ends of the straps or starting to crochet the second strap.
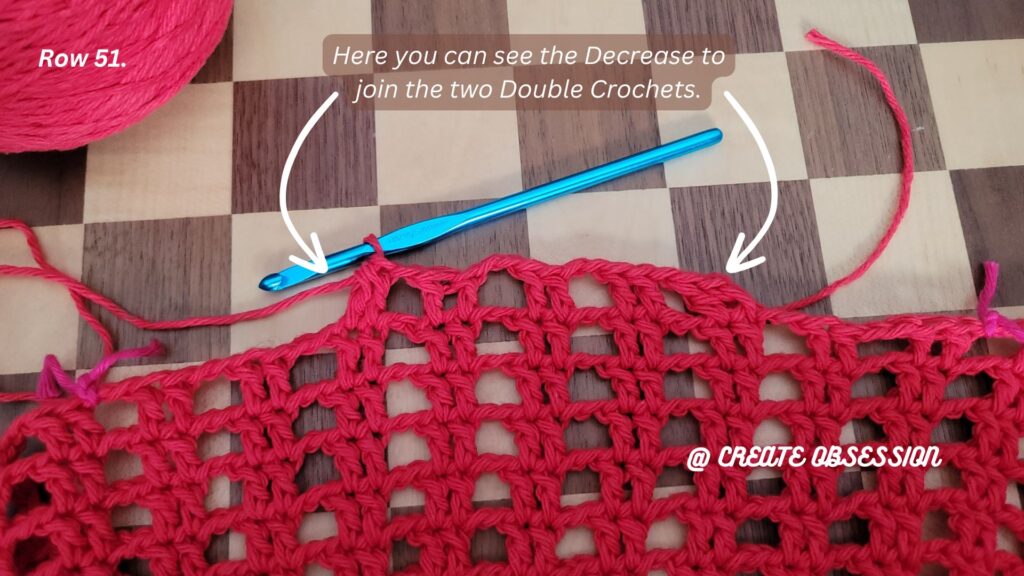
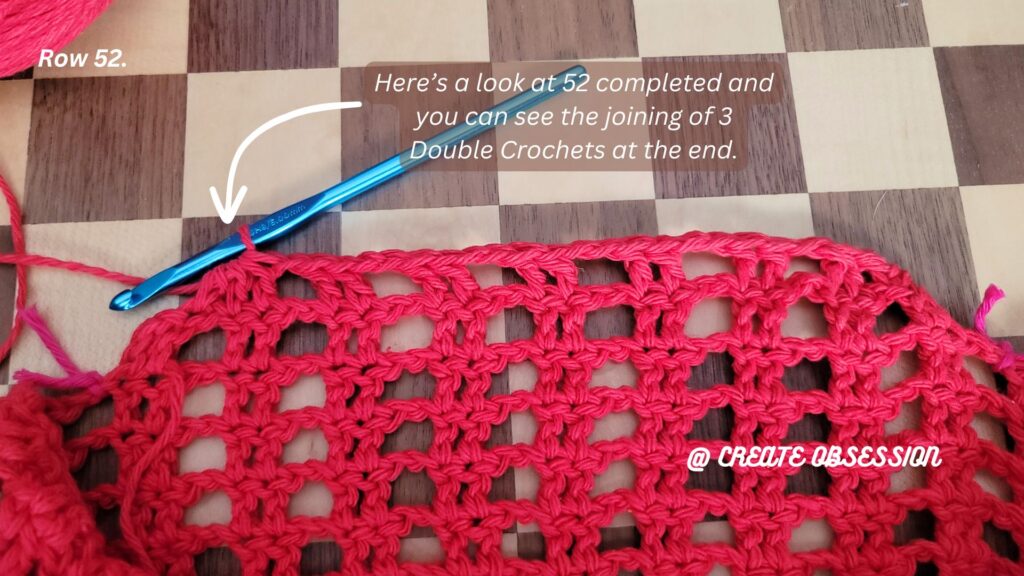
Row 51. Dec DC with Ch 2 or DC equivalent as the first st, Ch 1 & Skip Ch 2 Sps below, **2 DC, Ch 2 & Skip 2 Ch Sps below** repeat X’s 2, 2 DC, Ch 1 & Skip 2 Ch Sps below, Dec DC.
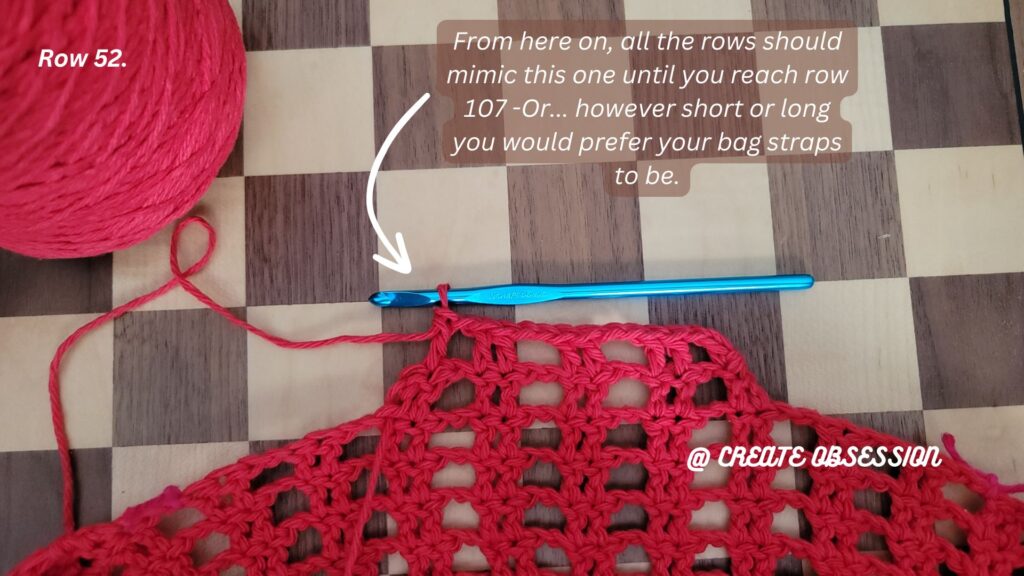
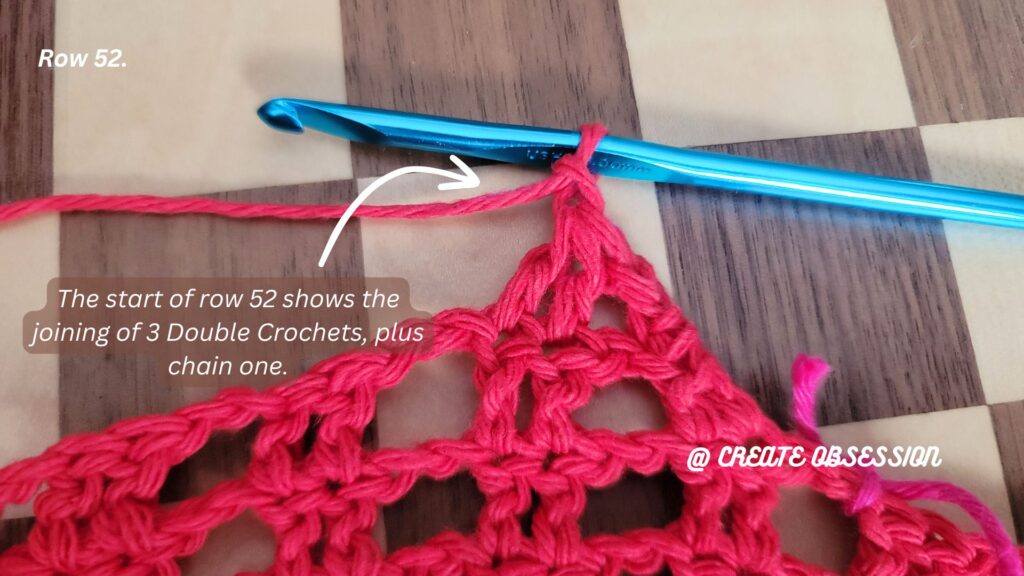
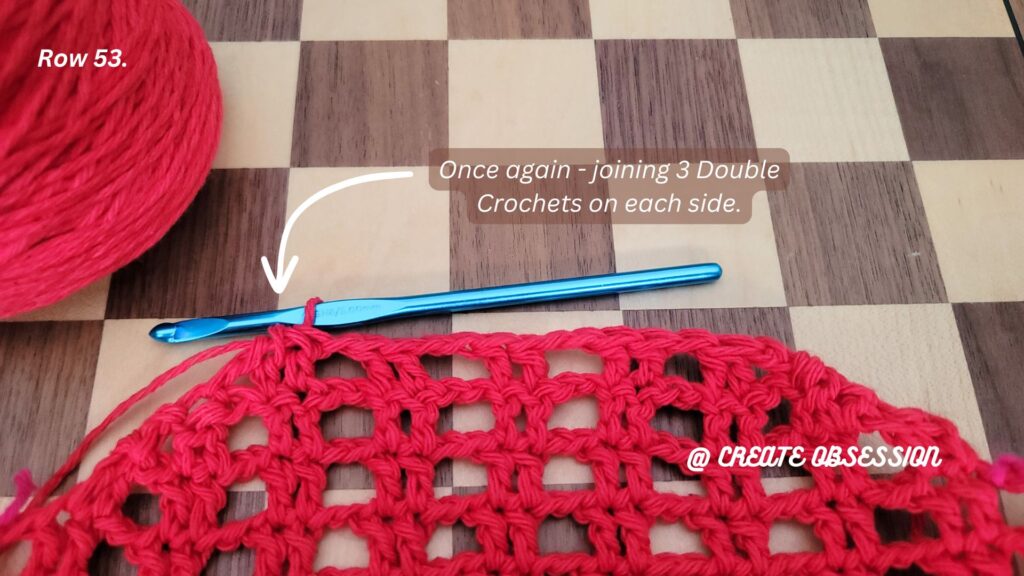
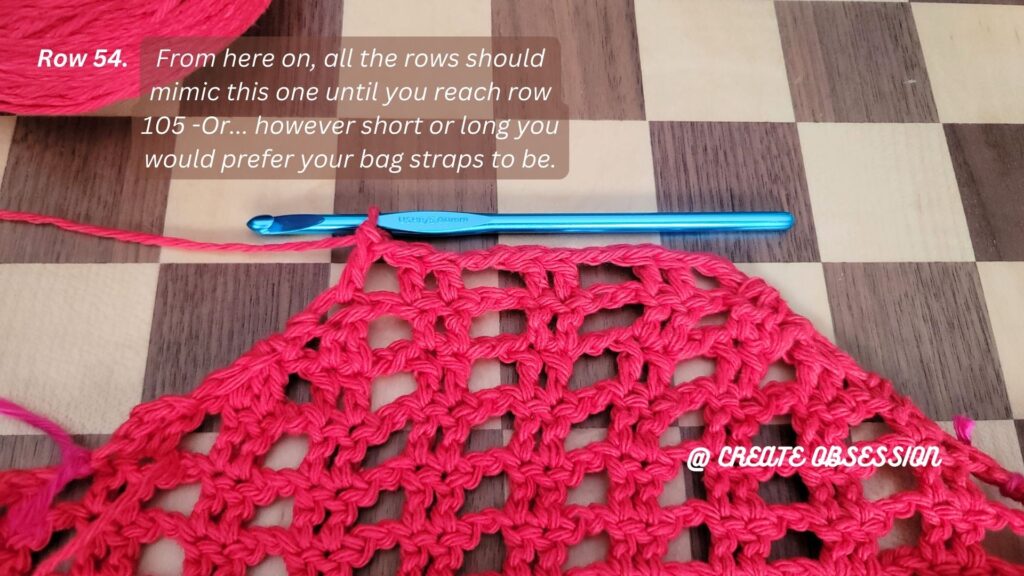
Rows 52-107. Ch 2 or DC equivalent into first st, Ch 1 & Skip Ch Sp below, **2 DC, Ch 2 & Skip 2 Ch Sps below** repeat X’s 2, 2 DC, Ch 1 & Skip Ch Sp below, DC.
Row 108. Inc DC with Ch 2 or DC equivalent into first st, Ch 1 & Skip Ch Sp below, **2 DC, Ch 2 & Skip 2 Ch Sps below** repeat X’s 2, 2 DC, Ch 1 & Skip Ch Sp below, DC Increase on last DC post. Sl st, and cut tail length to be 3-4X’s the width of the base of the strap for sewing.
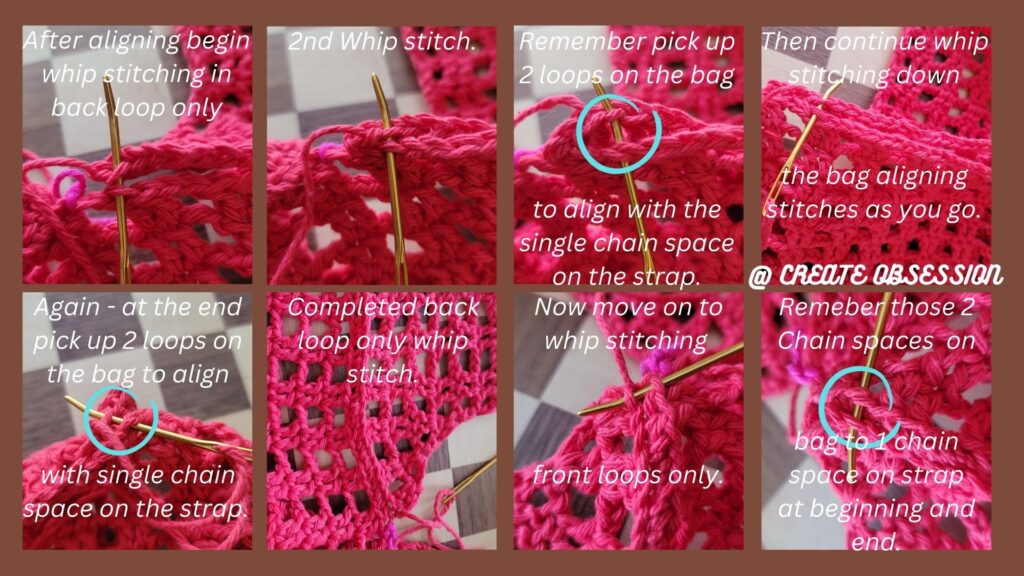
To sew the strap into place – make sure it is facing the correct direction when laid flat and line it up to the nearest 5 DC pairs you have marked for this strap. Match up the back loops only for the stitches of the posts and chains and begin whip stitching, remember the outer Ch Sps have 2 on the base of the bag and only 1 Ch Sp on the strap and you will need to account for that. Once reaching the end, add an additional whip stitch to edge if desired and return down whip stitching the front loop only of the strap to the base of the bag’s front loop only stitches, again remember the outer Ch Sps have 2 on the base of the bag and only 1 Ch Sp on the strap and you will need to account for that. Weave in ends and cut.
Repeat Rows 51-108 to make second bag strap, inserting the yarn working 5 DC pairs right to left that is identified for the next strap.
Creating the Straps (Curved at Base Version):
Before starting – add stitch markers grouping 9 DC pairs together -this should total 4 groups of 9 and will create the placement of the straps. This will also help deter you from over or under-counting the DC pairs that belong to each strap.
Row 51. Dec DC with Ch 2 or DC equivalent as the first st, Ch 1 & Skip Ch 2 Sps below, **2 DC, Ch 2 & Skip 2 Ch Sps below** repeat X’s 6, 2 DC, Ch 1 & Skip 2 Ch Sps below, Dec DC.

Row 52. Ch 2 or DC equivalent into first st, Dec DC pair, Ch 1 & Skip Ch 2 Sps below, **2 DC, Ch 2 & Skip 2 Ch Sps below** repeat X’s 4 , 2 DC, Ch 1 & Skip Ch 2 Sps below, Dec DC pair, DC into last DC.
Row 53. Ch 2 or DC equivalent into first st, Dec DC pair, Ch 1 & Skip Ch 2 Sps below, **2 DC, Ch 2 & Skip 2 Ch Sps below** repeat X’s 2, 2 DC, Ch 1 & Skip Ch 2 Sps below, Dec DC pair, DC into last DC.
Rows 54-104. Ch 2 or DC equivalent into first st, Ch 1 & Skip Ch Sp below, **2 DC, Ch 2 & Skip 2 Ch Sps below** repeat X’s 2, 2 DC, Ch 1 & Skip Ch Sp below, DC.
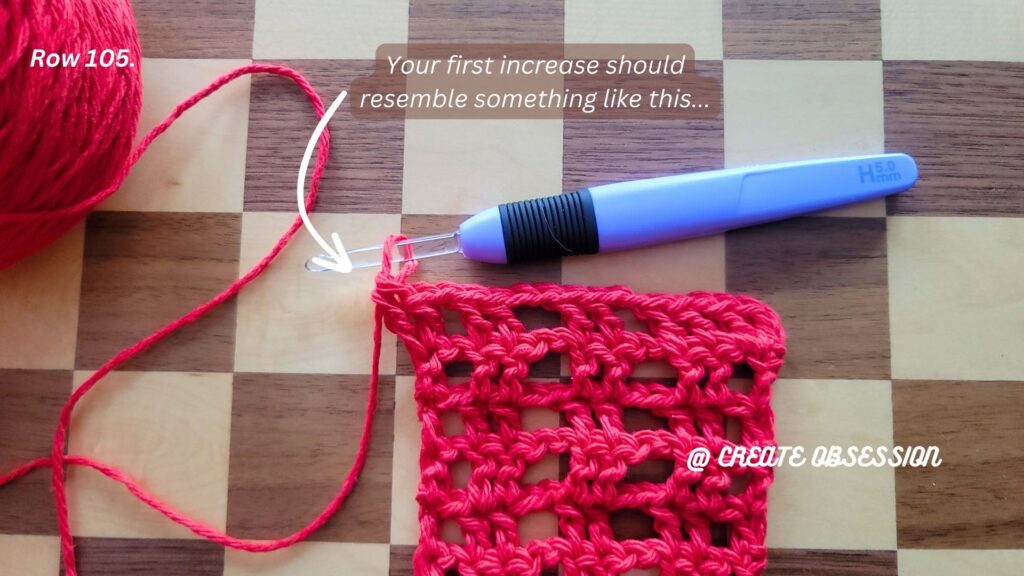
Row 105. Inc DC with Ch 2 or DC equivalent into first st, Ch 1 & Skip Ch Sp below, **2 DC, Ch 2 & Skip 2 Ch Sps below** repeat X’s 2, 2 DC, Ch 1 & Skip Ch Sp below, Inc DC.
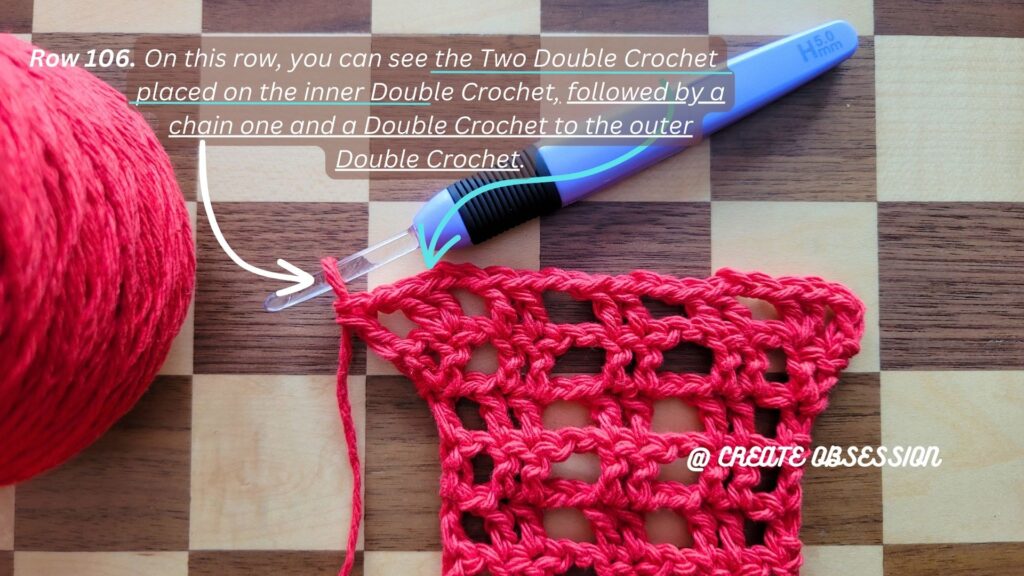
Row 106. Ch 2 or DC equivalent into first st, Ch 1, Inc DC into next DC post, Ch 2 & Skip Ch Sps below, **2 DC, Ch 2 & Skip 2 Ch Sps below** repeat X’s 3, Inc DC into first DC Post, Ch 1, DC into last DC post.
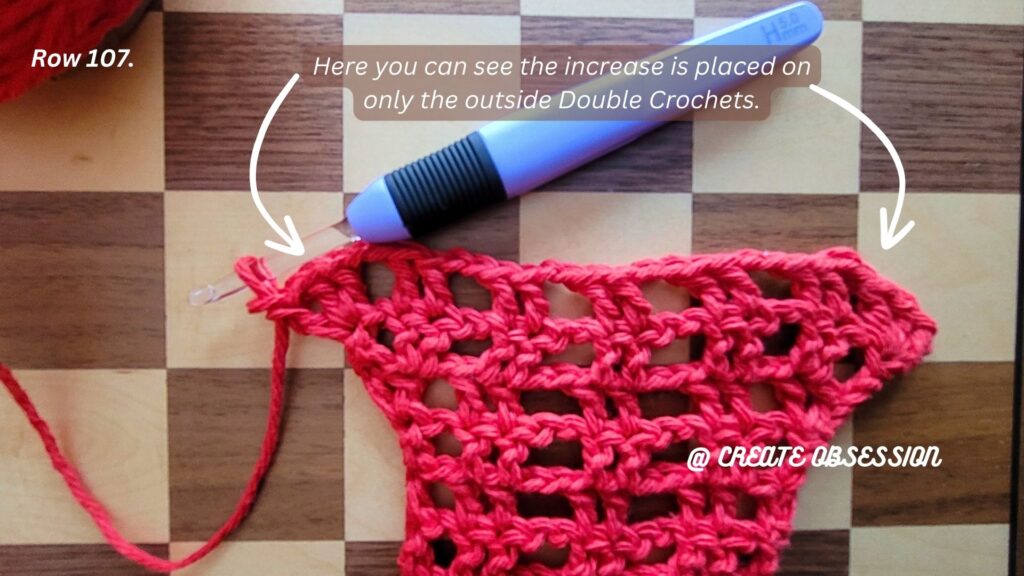
Row 107. Ch 2 or DC equivalent into first st, Ch 1, Inc DC into same st (Should be 1 DC, Ch 1 and Inc DC in first st), Ch 2 & Skip Ch Sps below, **2 DC, Ch 2 & Skip 2 Ch Sps below** repeat X’s 5, Inc DC, Ch 1 and DC into Same St (Should Inc DC, Ch 1 and Dc into last st).
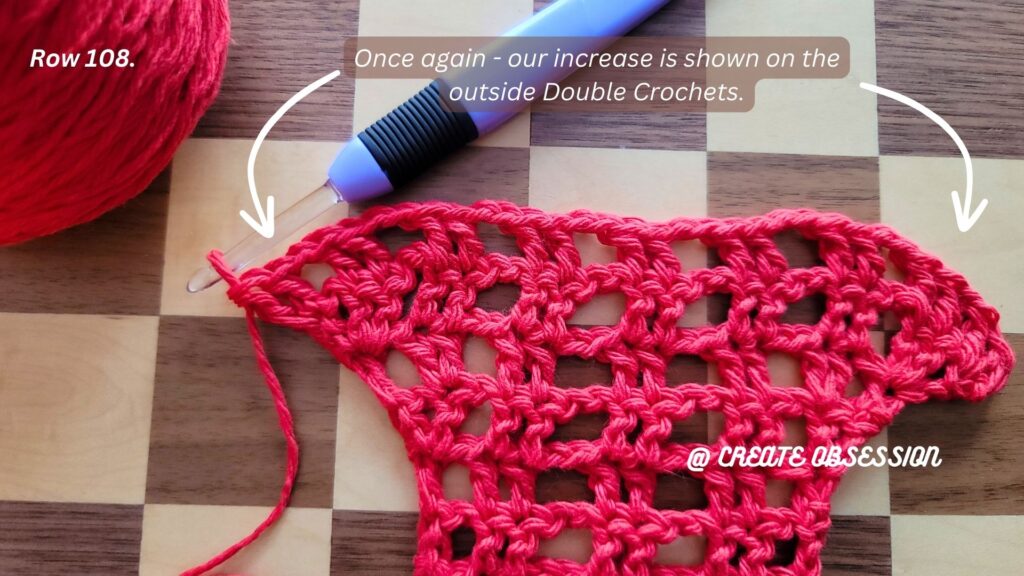
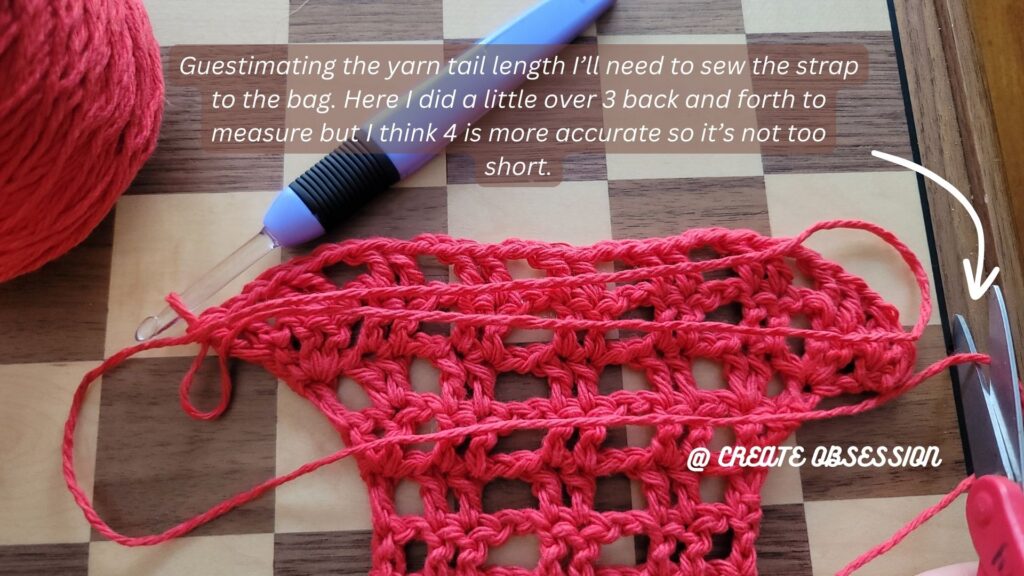
Row 108. Inc DC with Ch 2 or DC equivalent into first st, Ch 1 & Skip Ch Sp below, **2 DC, Ch 2 & Skip 2 Ch Sps below** repeat X’s 6, 2 DC, Ch 1 & Skip Ch Sp below, DC Increase on last DC post. Sl st, and cut tail length approximately 4X’s the width of the base of the strap for sewing.
To sew the strap into place – make sure it is facing the correct direction when laid flat and line it up to the nearest 9 DC pairs you have marked for this strap. Match up the back loops only for the stitches of the posts and chains and begin whip stitching, remember the outer Ch Sps have 2 on the base of the bag and only 1 Ch Sp on the strap and you will need to account for that. Once reaching the end, add an additional whip stitch to edge if desired and return down whip stitching the front loop only of the strap to the base of the bag’s front loop only stitches, again remember the outer Ch Sps have 2 on the base of the bag and only 1 Ch Sp on the strap and you will need to account for that. Weave in ends and cut.
Repeat Rows 51-108 to make a second bag strap, inserting the yarn working 9 DC pairs right to left that is identified for the next strap.
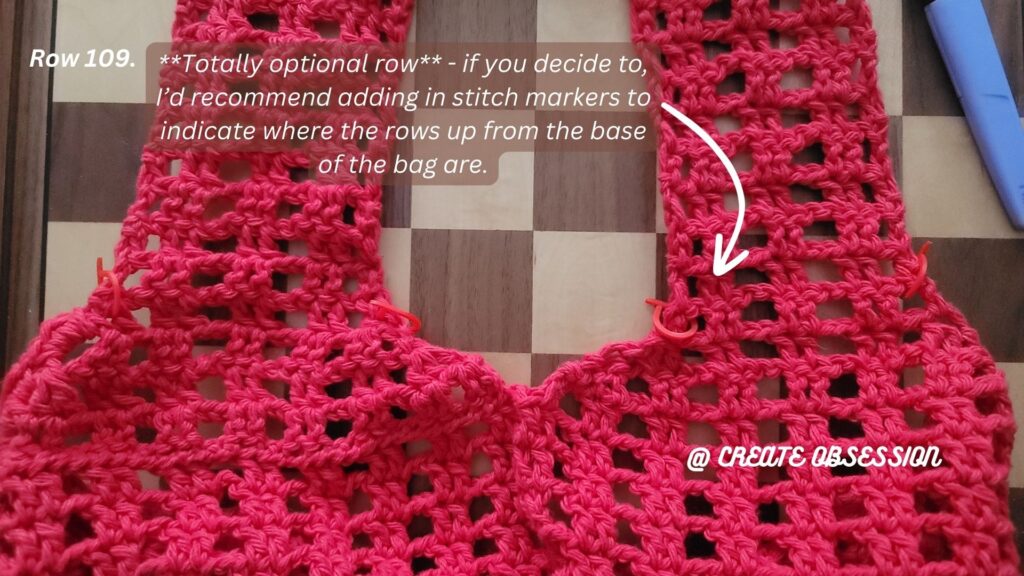
[Optional aesthetic finish:
Before starting – add stitch markers 4 rows up from the base on both sides of each bag strap, which should total 8 stitch markers. This will indicate placement for crochet starting and stopping points and will also help deter you from over or under-counting the Ch Sp openings.
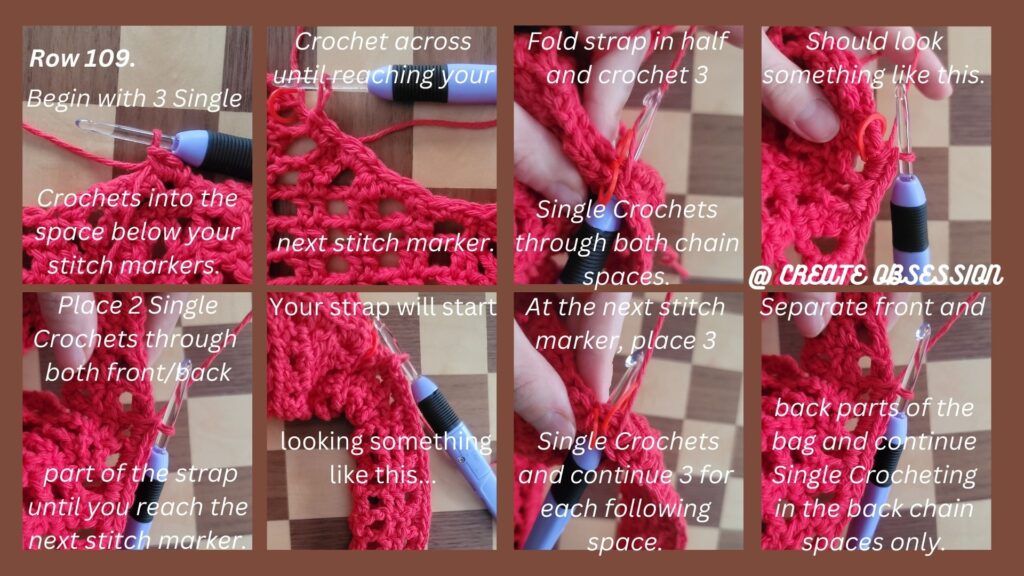
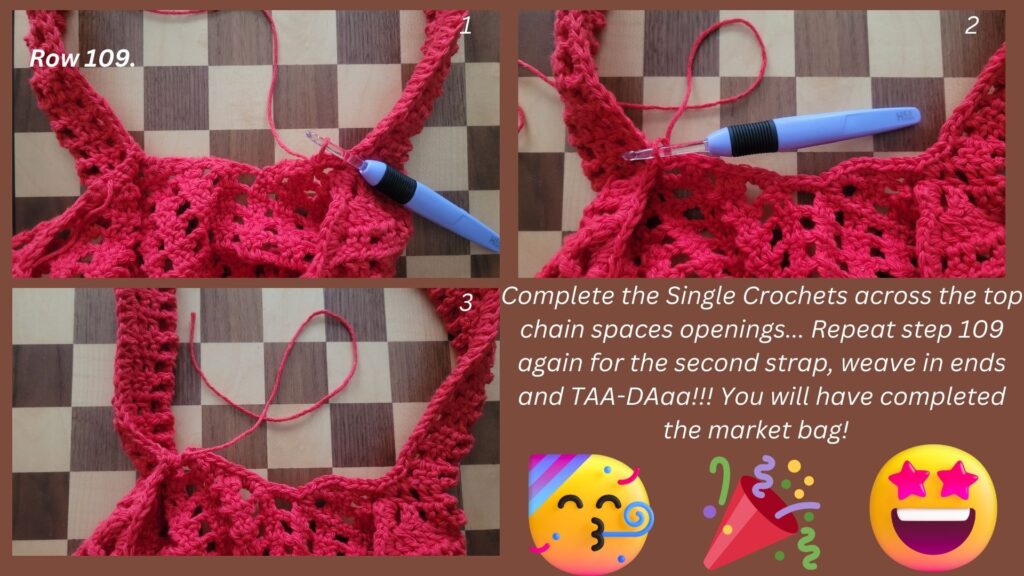
Row 109: (Keep yarn same or color change)** Starting at the base of a strap 3 CH Sp openings up (the row under your stitch marker), place 3 SC into each Ch Sp opening, working right to left until the row before your next stitch marker, 4 CH Sp openings up from the base of the bag.. Fold the strap in half, making sure to match up the mesh pattern, and insert the 3 SC through both front and back part of the straps . Going forward place 2 SC into each CH Sp opening throughout the strap until you reach the stitch marker at the end of this strap 4 CH Sp openings from the base of the bag and place 3 SC into that St. THe remaining 3 SC into each CH SP opening should be worked on the inside of the strap crocheting back the opposite direction until you reach the stitch marker 4 CH Sp openings up on the strap you’ve been crocheting. Sl st and leave a tail for weaving in ends..** Repeat one more time for your second strap working right to left. Weave in all ends.]
Hi, this is a comment.
To get started with moderating, editing, and deleting comments, please visit the Comments screen in the dashboard.
Commenter avatars come from Gravatar.